


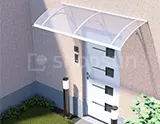


Side view
W = Pergola overhang
H1=Pergola support height (standard 270cm)
H=Height of support + 2cm
Do you have any questions? Need help?Call us +48 518 075 074
S=Pergola width, W=Pergola reach

W = Pergola overhang
H1=Pergola support height (standard 270cm)
H=Height of support + 2cm

S=Pergola width
H=Pergola support height +2cm

S=Total width of the modular structure
S1, S2, S3 = Width of individual modules
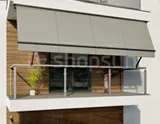
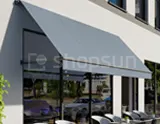
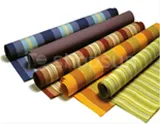
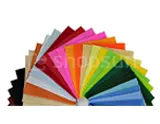
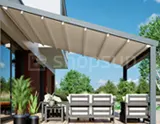
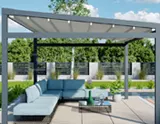
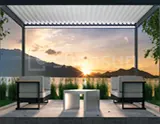
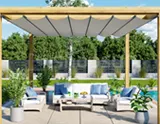
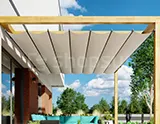
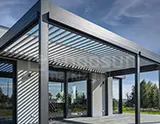
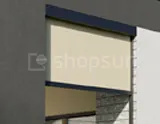
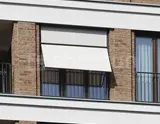
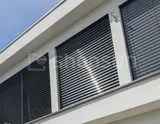
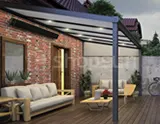
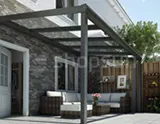
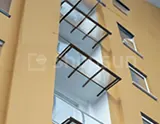
Structure made of extruded aluminum. Electric motor control as standard. Driplux roofing fabric as standard (can be replaced with another type of material for an additional fee). Powder coating possible in any RAL color. Pergola Flat (Luxury) is available in wall-mounted and free-standing versions. Possibility of modular connection. The product is resistant to wind speeds of up to 120 km/h.
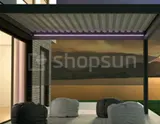
Possibility to choose additional equipment:
– lighting
– system roof protecting the fabric
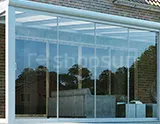
– glazing
– screener blinds
– heat radiators
– wind, solar and rain sensors


– Front
– Lower


The height of the HP package depends on the spacing between the wind protection beams. On request, the distance between the beams can be reduced while simultaneously reducing the height of the package

1 module: width 201-450cm
2 modules: width 451-900cm
3 modules: width 901-1300cm
*The guide is always in the leg axis

Pergola supports are usually attached directly to the ground. For an additional fee, mounting pads adapted to the type of water drainage from the structure are available.


1. GUIDES
2. FRONT SUPPORT PROFILE
3. SIDE PANEL WITH GUTTER
4. FRONT TAPING PROFILE
5. START PROFILE

6. UPPER COVER
7. DRIVE PROFILE
TNA.201.01 (inner shaft)
TNA.202.01 (outer shaft)
8. SHEET METAL PROCESSING
9. SYSTEM CANOPY
10. BINDING PROFILE
11. BINDING PROFILE

Pergola beams:
front beam,
center beam,
rear beam
Fabric trolleys:
front stroller,
middle trolley,
end carriage
The starter profile is screwed to the wall in several places, depending on the width of the pergola. The height of the starting profile is 140mm (the profile is not pre-drilled).
We drill it in any places according to needs, maintaining appropriate distances.
Please remember that the minimum distance for anchoring the profile on both sides is approximately 250mm.
The steel structure feet should be anchored in the designated places using threaded rods
and their securing nuts. A chemical anchor should be used for this purpose.
At a later stage, we put support profiles on the screwed mounting foot holders.
The guide should be connected to the front support profile by inserting the guide holder into the inner cube of the support profile, using screws M6x6pcs
Hang the guide on the holder in the starting profile and then screw it together using an M8x70 screw.
The complex connecting profile has a cap that must be removed before installing the profile.
The rest of the component should be connected to the front support profile by installing the connecting profile cube, using the previously prepared holes.
Installation of the rear fastening profile (this profile is supported by a protective canopy, which is available as an option).
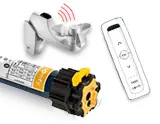
The fastening profile includes a Motorbox assembly. Insert the connecting profile (direction of movement is shown by the arrows) and secure with an M6x16 screw.
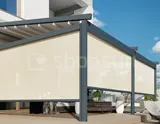
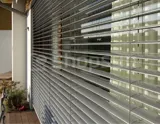
The side panel with a gutter is mounted on the right or left side of the pergola. It is used to drain water. We determine the installation side when ordering, depending on your needs. The water is drained into the gutter and then flows down the front support.
The side panel with a gutter also has a visual function. It covers the space between the beams. If necessary, we can also install such a panel on the opposite side of the pier (it will not drain water).
The side panel with the gutter should be inserted between the support profile and the facades, on the water drainage side.
A – pergola gutter, B – gutter side panel
The pergola fabric module is factory assembled and ready to be installed on the pergola structure. The fabric module consists of windproof beams. Strips of fabric are attached to each beam. The entire model must be attached to the guide carriages (which are factory-installed in the pergola guides).
*To facilitate the installation of the fabric module, it is best to use scaffolding or ladders to support the fabric as close to the guide carriages as possible.
The final part of the fabric module is the back beam, to which the final strip of fabric (the so-called bag) is attached (fig. A1). The bag should be attached to the previously installed profile (fig. A2).
Optionally, the pergola can be equipped with a protective canopy. It protects the fabric from dirt when fully rolled up. The roof consists of individual panels that are added together one by one.
Install the mounting bracket for the system canopy on the starting profile. This angle bracket is installed in subsequent modules without a motorbox.
Installation of the side flashing of the system roof:
– glue the butyl ribbon
– place the flashing on the side wall of the guide and tighten it with self-drilling screws
– repeat the operation on the opposite guide
Installation of the first panel of the system canopy. Slide the first panel under the side flashing of the system canopy and lock it with self-drilling screws.
Installation of subsequent panels:
Fasten the first panel with flat-head self-drilling screws to the attic profile.
– install another panel,
– click at the connection point and lock with screws.
– repeat the action
Cut the last panel to + 25mm and bend the edge upwards. Slide the cut panel under the side roof flashing and lock it with a self-drilling screw.
Installation of the front angle for the system canopy:
Install the masking angle:
– place the angle bracket with handles on the edge of the attic beam
– screw it with a self-drilling screw and an EPDM washer to the attic beam.
Installation of the upper grille
Insert the top cover into the starting profile using the port, the cover flap should be inserted
lock with a screw
Installing the side cap
Fix with screws, Install the side cap, cut to the wall curve
Install the side cap, cut to the wall curvature
Rainproof pergola, Rainproof pergola, Rainproof terrace roof, pergola water drainage, pergola hidden gutters, pergola water drainage gutters, rainwater drainage, pergolas with gutters, terrace roof with gutter , cross-section of pergola gutter, pergola for terrace gutters, pergola for terrace with water drain, Luxury Wall Pergola - Technical Data - terrace pergola, sliding terrace roof, terrace pergola with movable cover, PVC terrace cover, polycarbonate terrace roof, custom-made aluminum structure, aluminum structure of a winter garden, aluminum pergola online store, aluminum pergola allegro, aluminum pergola, terrace pergolas, pergola roofing, canvas terrace roofing, pergola in installments, garden pergola, pergola for the balcony, pergola for the terrace, pergola awning quote, obi pergola, castorama aluminum pergola, aluminum pergola price, Pergola soft, pergola decor, Pergola, aluminum pergola, terrace pergola, modern pergola, garden pergola, terrace pergola, terrace pergola, terrace roofing, portable garden pergola, pergola with wavy fabric, Luxury wall pergola , wall pergola for the terrace, pergola with two arms, Aluminum pergola price, pergola sunroof, restaurant pergola, Luxury pergola to size, modern pergola, pergola for the balcony, pergola for the terrace, corner pergola, corner pergolas, pergolas in the garden, pergolas for order, Custom-made wall pergola, wall pergola for the terrace, pergola with two arms, aluminum pergola, aluminum pergolas, aluminum pergolas, aluminum terrace roof with movable roof, automatic terrace roof, electric terrace roof, modern pergolas, modern pergolas for the terrace, modern terrace roofs, modern terrace roof, opening terrace roofs, aluminum pergola, aluminum pergola, automatic pergola, electric pergola, slatted pergola, fabric pergola, pergola for the terrace, pergola on the terrace, pergola over the terrace, sun pergola, pergola next to the terrace, sliding pergola , movable pergola, foldable pergola, terrace pergola, aluminum terrace pergola, terrace pergola price, terrace pergola with a movable cover, foldable terrace pergola, fabric pergola, pergola with a sliding roof, pergola with a sliding roof, pergola with a movable roof, pergola with a roof , pergola with curtains, pergola roof, pergola terrace roof, pergola with a roll-up fabric roof, aluminum pergolas manufacturer, automatic pergolas, electric pergolas, slatted pergolas, fabric pergolas, terrace pergolas in Warsaw, modern pergolas, foldable pergolas, aluminum terrace pergolas, terrace pergolas prices, fabric pergolas, terrace roof pergolas, roll-up pergolas, terrace roof manufacturer, foldable terrace roof, retractable terrace roof, movable terrace roofs, movable terrace roof, foldable terrace roof, terrace roof system, covered wooden terrace, pergola terrace, terrace with pergola, terrace with roof, terrace roof, terrace roll-up roof, terraces pergolas, terrace roofs, terrace construction terrace construction terrace roofs, aluminum roofs, terrace roofs, terrace roofs, garden roofs, pergola roofs, terrace roofs, terrace roofs , sliding terrace roofs, terrace roofs, terrace roof, terrace roof, garden roof, pergola roof, sun protection roof, terrace roof, terrace roof, terrace roof, aluminum terrace roof, terrace roof automatic terrace roof price list, terrace roof price, roof electric terrace roof, modern terrace roof, pergola terrace roof, terrace roof design, sliding terrace roof, sliding terrace roof, movable terrace roof, movable slats terrace roof, foldable terrace roof, terrace roof with sun blind, roll-up terrace roof, blinds terrace roof, covered terrace, roll-up terrace roof, roll-up terrace roof, light pergola


